Primary & Pro Assembly Guide
The following instructions are for most round and square growing containers.
NO TOOLS REQUIRED
ASSEMBLES IN MINUTES
P SCROG System parts
Qty - Description
1 - 24" base with locking channel
4 - Multi-directional removable casters
4 - Telescoping rods
4 - Junction caps
1 - Primary training screen 21" square
4 - Grip pads
8 - Velcro® pieces
8 - Zip ties
In addition to the P SCROG Primary System parts above, P SCROG Pro Systems also include:
1 - Pro support screen 21" square
4 - 3/8"- threaded nylon rods, 12" long
4 - 3/8"- threaded brass inserts
8 - 3/8"- threaded nylon wing nuts
P SCROG Systems make scrogging simple and can be easily assembled in a matter of minutes around most common growing containers approximately 10" to 22" round or square, hydroponic or organic. Telescoping rods attach to the most common containers with either Velcro or zip ties included in system kits. Grip pads are also supplied to place in the base channel locks to prevent hard bottom containers from moving on the system base.
P SCROG Primary System utilizes 1 - 21" square (3.25" openings) primary screen for training and low demand support. P SCROG Pro System utilizes 2 - 21" screens, a lower primary training screen (3.25" openings) and an upper support screen for high demand support (5" openings). Each adjusts vertically independent of one another.
Typically, DIY ScrOGs are built over plants in late vegetative cycle and are fixed in place until harvest. P SCROGs can be assembled either before plants are introduced to the container or anytime during vegetative growth. While not necessary, the optimal situation is to assemble P SCROG systems through step 6 before introducing plants, then add the Primary training screen when the plant reaches your target height for training. If using the Pro System, the Pro support screen can be added at any time during the flowering cycle.
Assembly Technique
Before you begin, clear a working area to assemble your P SCROG and have your plant container and medium nearby.
 1. Remove the system base from the box and place it upside down on a hard but protected flat surface.
 2. Unpack the system's 4 casters and fully seat the shaft of each caster into the 4 corresponding caster holes on the bottom of the base. Then, return the assembled system caddy topside up sitting on its caster wheels.
 3. Measure the bottom of your plant container. Take the bottom rim diameter dimension for round, one side length dimension for square and divide by 2. Example - if the bottom of the container is 16" diameter or 16" square, measure out 8" from the center "cross hairs" along the reference line and put a light pencil mark in the floor of the channel. Measure and mark all 4 channels of the base legs in the same manner. These marks represent the outside perimeter of your growing container and the system will be properly centered when placed on these marks.
 4. If you are using a hard bottom container, place a grip pad directly over each of the marks in the locking channel such that the marks are centered under the grip pad. We recommend that you leave the paper backing on the back of the grip pad and avoid use of the adhesive back. Leaving the backing on makes repositioning and reuse in future grows easier. The grip pad is not necessary if you are using a fabric pot like a Smart Pot®.
Like anything else, experience eyeballing the centering of the container on the base will obviate the need to measure for center as in step 3 above. However, to be more precise you may want to use the debossed center lines and cross hairs on the top surface of the base as reference, at least on your first P SCROG.
If you are setting up a DWC bucket, remove the handle at this time. Fill the container with growing medium which will add weight and prevent the container from moving on the base. If using an Air-Pot®, add medium to the 2nd row of holes below the reservoir level.
 5. Place your container on the base with its bottom perimeter edges centered over the 4 grip pads (for hard bottom containers). For fabric pots, edges will position on the four pencil marks in the channel. Fill the container with the growing medium which will add weight and prevent the container from moving on the base.


Velcro or zip ties (supplied in the system kits) will secure the vertical telescoping rods to virtually all containers. Containers like DWC buckets and square pots will utilize Velcro, while fabric pots, Smart Pots and Air-Pots are best secured with zip ties.

 6. DWC Bucket with Velcro - Be sure that surfaces that receive Velcro are clean and dry. Remove the paper backing from 1 of the 4 Velcro adhesive backed pieces. Apply the adhesive side of the Velcro to a flat surface at the most outer perimeter of the container centering it directly above each base leg (see illustrations). Apply all 4 pieces of adhesive backed velcro in the same manner to the perimeter of the container centering them directly above the legs on the outer most surface (rim).
 Slide the top of each of the 4 telescoping rods through the slitted Velcro pieces with the P SCROG brand facing you.
 Each telescoping rod has rubber feet that are pressure fit into each of the 4 locking channels of the system base.
 The rods are firmly supported by the rubber feet in the locking channels and the Velcro attached to the rim. A level can be used to more accurately align rods during the process if desired.
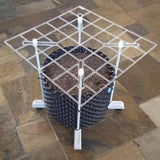
 6. Fabric pot/Smart-Pot with zip ties - While making sure that the pot remains centered on the base, fully seat the rubber foot of one of the telescoping rods in a leg locking channel of the base closest to the bottom edge of the pot. While holding the rod vertical, put a hole in the fabric with a knife on each side of the rod towards the top of the pot, an inch or two below the top of the growing medium. The fabric is more gently penetrated by applying pressure at the tip of the knife and using a twisting motion to create small holes for the zip ties. Do the same thing near the bottom of the pot just above the rubber foot of the telescoping rod. (A level can be used to more accurately align the rods before putting holes in the fabric.)
 Take zip ties and slip them through the holes made at the top and bottom of the pot. Now secure the telescoping rod at top and bottom by wrapping the zip ties around the rods and zipping tight.
 Secure the remaining rods to the pot in the same manner.
The telescoping rods are firmly supported by both the rubber feet in locking channels and the zip ties attached.
6. Air-Pot with zip ties - While making sure that the pot remains centered on the base, place the rubber foot of one of the telescoping rods in a locking channel of the base closest to the bottom edge of the pot.
 The rod is secured with zip ties that lace through holes in the Air-Pot at the bottom rows and top rows of holes just below the reservoir level.
 Be sure that the rod is vertical before zip locking the tie. A level can be used to more accurately align the rods before securing zip ties if desired. Do the same for the remaining rods. Now that the rods are secured you can top off the container's medium to the desired level.
The rods are firmly supported by the rubber feet in the locking channels and the zip ties attached.
Containers are now prepared to receive screens. SCROGGER recommends that you do not add a screen until the plant reaches the target height for training. When you are ready to train your plant, proceed to the next step.


Adding Primary Training Screen
7. Unpack the 4 white junction caps.

 For P SCROG Pro - Unpack and install one threaded brass insert into each of the large holes of the junction caps using firm hand pressure (do not use a hammer). The brass insert collar will be flush with the top of the cap when installed properly.
 For P SCROG Primary and Pro - Slide the junction caps through the Primary training screen keyholes with the caps' large diameter holes (or brass inserts for Pro Systems) facing up. Slide the junction cap in the corresponding support slot of the screen pushing the cap temporarily toward the center of the screen.
Make sure all four telescoping rods are adjusted at least 6 inches above the top of the plant before proceeding to reduce chances of damaging the plant. To adjust, twist the top of the rod counter clockwise for up and clockwise for down.
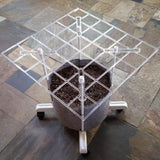
 8. Being careful not to disturb the plant, hold the Primary training screen screen parallel to the floor over the extended rods and one by one slide the junction caps in the screen slots to position them over the top end of each telescoping rod.
 9. With firm pressure and twisting motion, one by one insert the top end of the telescoping rod into the bottom hole of each corresponding cap and fully seat. An assistant can be helpful with this step.
10. Adjust the primary training screen to desired level for training by twisting the junction caps between fingers and thumb. SCROGGER recommends beginning with a slightly higher screen level and adjusting down in small increments during training.

DWC tip - Before adding a screen, it is helpful to drill a hole in the top of the net pot lid to feed the plant and change nutrients. The hole can be plugged when not in use with a rubber stopper from a hardware store.
You're done with your P SCROG Primary System. Enjoy your portable and adjustable ScrOG!
P SCROG Pro System owners continue below.
P SCROG Pro Systems
P SCROG Pro System owners should make sure during plant training that the 4 brass inserts are not covered by vegetation and remain accessible to receive the threaded nylon rods. The threaded nylon rods with bottom wing nuts can be added early. The Pro screen and the top wing nuts can be added later once the flowers have reached the target height.
Unpack the 12" nylon threaded rods, wing nuts and Pro screen.
 1. Hold a threaded nylon rod vertical in one hand while positioning a threaded nylon wing nut upside down (flat side up), thread it onto the rod to its desired position. If you want the Pro screen to float say 7" above the Primary training screen, thread the wing nut (flat side up) to approximately 7" above the bottom end of the threaded nylon rod. Do the same thing for all 4 rods.
 2. Thread the bottom of each nylon rod into each brass insert. SCROGGER recommends only using 2 to 3 threads to secure the rod in the brass insert in order to ensure ease of removal if necessary.
 3. When ready for the Pro support screen, hold it parallel to the floor and lower it such that the 4 threaded nylon rods slide through the screen's corresponding slots and rests on the flat surfaces of the 4 wing nuts.
 Take the remaining 4 wing nuts and thread them down the nylon rods (flat side down) until they lightly tighten on the top surface of the screen.


You're done with your 2 tier portable and adjustable P SCROG Pro System.
Enjoy!
![]()